
Shipping information is essential in eCommerce. Online buyers check shipping rates and rules before checking out. And any new Shopify online store would need to set up shipping information to ensure a seamless checkout process. Transparency is critical in setting up Shopify shipping, as some buyers can quickly abandon their cart when shipping details are unfavorable. Here’s a step-by-step guide on how to set up shipping on Shopify.
What to Consider Before Setting Up Shopify Shipping
Before learning how to set up Shopify shipping, take a look at these three crucial pre-requisites:
- Your business must have an eligible fulfillment location
- Your business must not collect duties and import taxes at checkout because Shopify shipping doesn’t support DDP or delivered duty paid
- Review different Shopify Shipping carriers’ policies to ensure they meet your business needs
How to review Shopify shipping business eligibility
Shopify requires you to buy shipping labels, allowing you to print shipping labels from your Shopify account. You’ll also get discounted rates for your shipping labels. However, you need to ensure your Shopify business has an eligible fulfillment location.
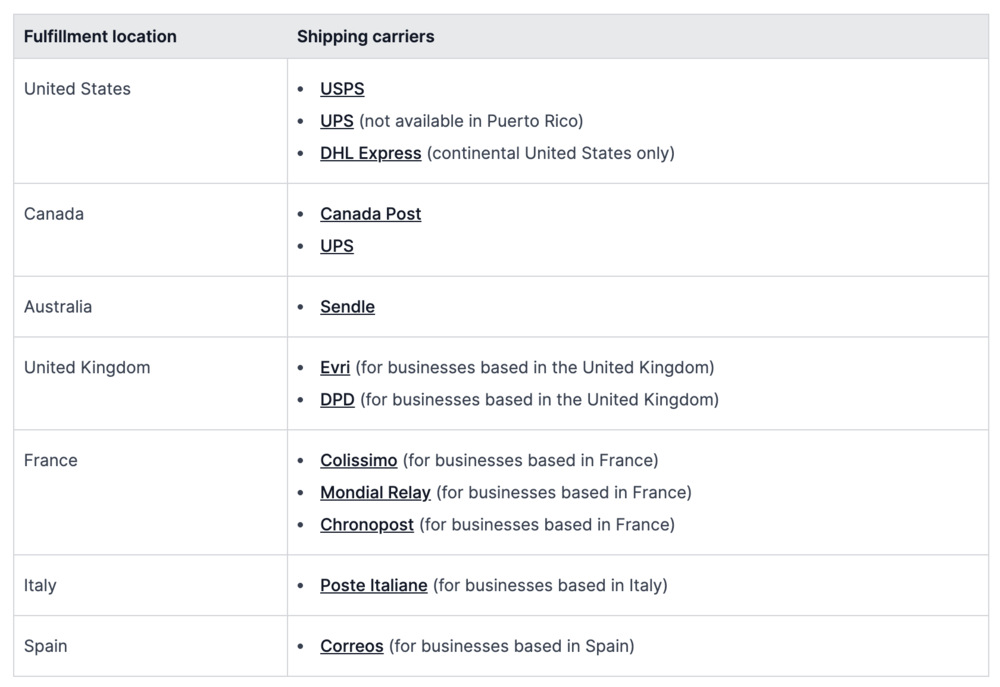
For one, your business must be based in the same country as the fulfillment location. For example, if your store’s fulfillment location is in the United Kingdom, the address should also be in the U.K. That way, you can buy shipping labels from couriers DPD (delivery duty paid) or Evri.
Check this table to know which shipping labels you can purchase based on your store’s fulfillment location:
How to add Shopify shipment details
Shipping carriers consider the following information to calculate shipping rates for product packages. That said, it’s crucial to add accurate details to your products, such as:
- Origin address
- Destination address
- Package dimension (The default product package dimension is used during checkout. When using multiple product packages, adjust the dimensions when purchasing shipping labels. Note: Use a shipping app if you want shipping carriers to calculate shipping rates based on the packages)
- Package weight (You must add the precise weight of the product and container. The shipping rate is calculated based on the product weight plus the box, envelope, or any shipping container)
What are the default Shopify Shipping rates?
Once you create a new Shopify account, the shipping calculated rates are added by default depending on the timezone:
- USPS rates are added by default if the store is based in the United States
- Canada Post rates are added by default if the store is based in Canada
- Flat rates are added by default if the store is based in Australia
Note: Refer to the “Create calculated shipping rates” section in this ‘How to Set Up Shipping on Shopify’ guide
How to set up shipping profiles on Shopify
Your shipping profiles determine the rates based on the details you enter. Each shipping profile follows certain rules that identify shipping rates. These profiles are also product-based. That said, if you’re charging a flat shipping rate, create a general shipping profile. Otherwise, create custom shipping profiles for a variety of shipping rates based on different products.
Shopify will charge different shipping rates based on where your products are coming from and delivered to. Add the products that share the shipping rate to the appropriate shipping profile. Then, set up the different shipping zones and rates for those products.
What to consider when setting up Shopify shipping profiles:
- Each location in the shipping profile will have its own shipping zones and rates
- Some apps, like on-demand custom printing apps, are automatically added as a shipping profile location and can change your shipping setup
- If products have different shipping rates, all rates are combined and added at checkout. This results in higher shipping costs for buyers.
- Only one product or product variant can be added to a shipping profile. If the same product or product variant is added to another shipping profile, this will be removed from the first shipping profile.
How to set up a general shipping profile on Shopify
Choose a general shipping profile if you want the same shipping rates for all products. Here’s how:
- From Shopify admin > Settings > Shipping and delivery
- Go to the General shipping rates section > Shipping profile
- In the Shipping origins section, the edit changed to locations. Check managing fulfillment locations.
- To set up each shipping zone in your shipping profile, go to the Shipping zones section > Create zone. Name the shipping zone, select the zone’s regions or countries, and click Done.
- To add each shipping rate in the zone, click Add rate, select the rate’s details, and click Done.
- Click Save
How to set up a custom shipping profile on Shopify
If you prefer different shipping rates for different products, create a custom shipping profile. You can create up to 99 custom profiles! Here’s how:
- From Shopify admin > Settings > Shipping and delivery
- Go to Custom shipping rates > Create a new profile
- Enter the profile’s name
- Go to the Products section > Add products. Then, add products to the shipping profile.
- Go to the Shipping origins section and edit changes to locations. Check fulfillment locations.
- To set up each shipping zone in your shipping profile, go to the Shipping zones section > Create zone. Name the shipping zone, select the zone’s regions or countries, and click Done.
- To add each shipping rate in the zone, click Add rate, select the rate’s details, and click Done.
- Click Save
Note: Check managing fulfillment locations to manage active locations, deactivate locations, create a new group of locations, add a new location to a group of locations, or remove a location.
How to set up shipping on Shopify: 9 different categories
Before learning how to set up shipping on Shopify, familiarize yourself with shipping zones and shipping profiles. The former pertains to a group of regions or countries you base your shipping rates on. While the latter helps you identify the rates for particular products and locations.
Note: Ensure that the region or country is included in an active market in your Market settings. If a region or country is inactive, customers can’t place an order even if the region or country belongs to a shipping zone with given shipping rates.
1. How to create flat shipping rates

Flat shipping rates refer to an amount within a shipping zone or orders placed on a particular threshold. For example, you can create a flat shipping rate for orders made over $100. Follow these steps:
- From Shopify admin > Settings > Shipping and delivery
- Go to the Shipping section, choose the shipping profile you want to add rates to
- Click Add rate next to the zone
- Select a transit time or custom flat rate to name the rate
- Add price-based or weight-based conditions (optional)
- Click Done
- Click Save
2. How to create shipping rates in local currencies

This option creates a flat rate for customers in particular countries. For instance, you can offer a flat shipping rate for buyers from the United States. However, this option is only available to stores using Shopify Payments.
- From Shopify admin > Settings > Shipping and delivery
- Go to the Shipping section, choose the shipping profile you want to add rates to
- Click Add rate next to the zone
- Select a transit time or custom flat rate to name the rate
- Enter the shipping rate and choose the local currency for the region or country
- Add price-based or weight-based conditions (optional)
- Click Done
- Click Save
3. How to create calculated shipping rates on Shopify

Calculated shipping rates are determined upon checkout by a third-party courier company. These rates are the exact amount that couriers, such as FedEx or UPS, charge.
- From Shopify admin > Settings > Shipping and delivery
- Go to the Shipping section, choose the shipping profile you want to add rates to
- Click Add rate next to the zone
- Choose Use carrier or app to calculate rates
- Choose the shipping service from the drop-down menu
- Go to the Services section, choose the shipping methods from your chosen shipping service
- Offer any new services from the shipping service in the Future Services section (optional)
- Add handling fees you’d like added to the calculated rate (optional)
- Click Done
- Click Save
4. How to set up mark up or discounted calculated rates

You can set up discounted rates or mark up rates depending on the total shipping rate. These amounts will be calculated upon checkout. For instance, if the shipping rate is too high, you cn offer a calculated discounted rate. Otherwise, you can increase shipping rates to cover handling costs and packaging.
- From Shopify admin > Settings > Shipping and delivery
- From the Shipping section, select the shipping profile you want edited
- Click the kebab drop-down menu (…) beside the rate you want to edit > Edit rate
- Go to the Handling fee section, set the new rate
- Click Done
- Click Save
5. How to create free shipping rates on Shopify

You can add free shipping to specific shipping zones or when shopping criteria are met. Better yet, set free shipping as your default rate for all orders. Here’s how:
- From Shopify admin > Settings > Shipping and delivery
- From the Shipping section, select the shipping profile you want edited
- Add a free shipping rate for each shipping zone by clicking Add rate, entering the name for the rate, and setting the Price value to 0
- Click Done
- Click Save
6. How to create free price-based shipping

You can set up free shipping if a customer reaches a certain value. Add a price-based condition to your shipping settings.
- From Shopify admin > Settings > Shipping and delivery
- From the Shipping section, select the shipping profile you want edited
- Add a free shipping rate for each shipping zone by clicking Add rate, entering the name for the rate, and setting the Price value to 0
- Click Add conditions
- Click Based on order price
- Enter a minimum price
- Click Done
- Click Save
7. How to create free weight-based shipping

Add weight-based shipping conditions to let customers enjoy free shipping over a certain weight. Follow these steps:
- From Shopify admin > Settings > Shipping and delivery
- From the Shipping section, select the shipping profile you want edited
- Add a free shipping rate for each shipping zone by clicking Add rate, entering the name for the rate, and setting the Price value to 0
- Click Add conditions
- Click Based on item weight
- Enter a minimum weight
- Click Done
- Click Save
8. How to create free shipping for specific products

Create a custom shipping profile that contains all the products that come with free shipping before setting this up.
- From Shopify admin > Settings > Shipping and delivery
- From the Shipping section, select the shipping profile you want edited
- Add a free shipping rate for each shipping zone by clicking Add rate, entering the name for the rate, and setting the Price value to 0
- Add weight-based or value-based conditions (Optional). If you add this, click Add conditions and select whether the condition will be based on order weight or value. Enter the minimum and maximum value.
- Click Done
- Click Save
9. How to create free shipping for specific customers

Create a free shipping discount for customers by giving them the discount code. Customers must enter the discount code during checkout to apply free shipping on their orders.
How to edit a rate on Shopify
- From Shopify admin > Settings > Shipping and delivery
- From the Shipping section, select the shipping profile you want edited
- Click the kebab menu (…) next to the rate you want edited
- From the drop-down menu, select Edit rate
- Enter the rate
- Click Done
- Click Save
How to delete a rate on Shopify
- From Shopify admin > Settings > Shipping and delivery
- From the Shipping section, select the shipping profile you want edited
- Click the kebab menu (…) next to the rate you want deleted
- From the drop-down menu, click Delete
- Click Save
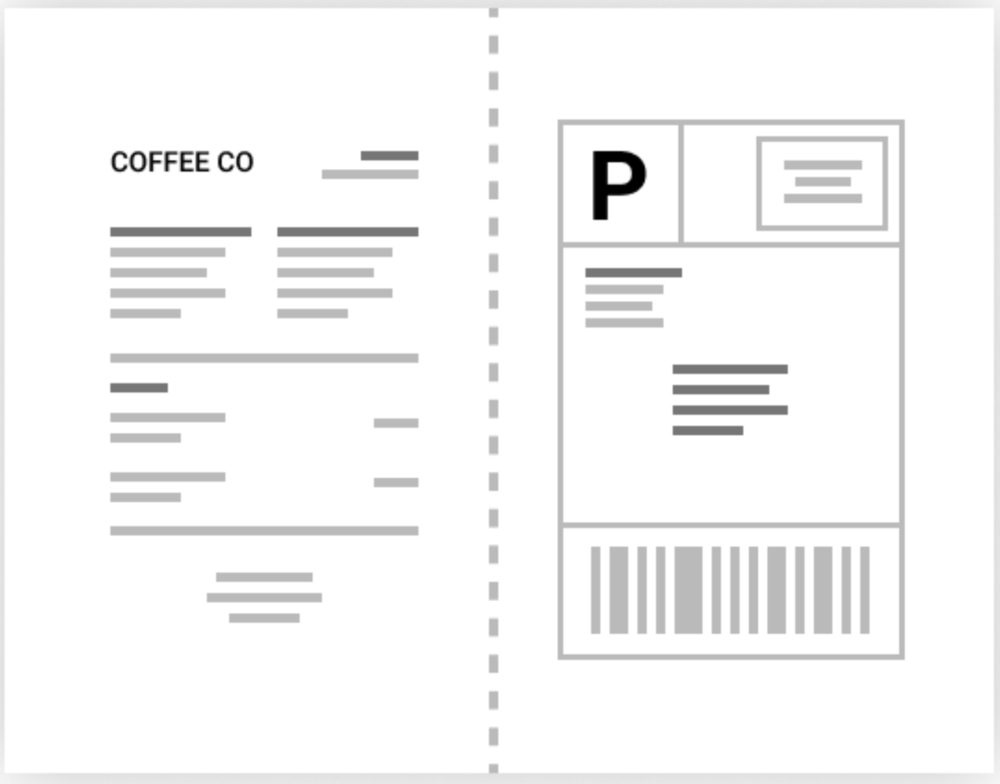
What are Shopify shipping labels?
Shipping labels are attached to a product’s packaging with shipment details. Here are some information you can find on shipping labels:
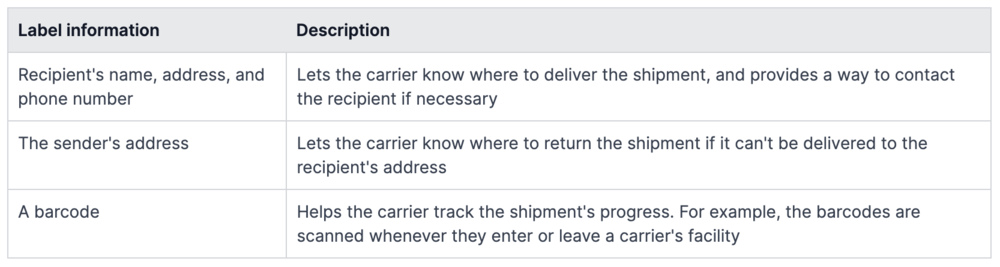
On top of these details, your shipping label will also show the following information:
- Order number
- Tracking number
- Shipment date
- Type of shipping purchased
- Shipping carrier’s information
How to use shipping labels for orders:
Before buying shipping labels, ensure your business has an eligible fulfillment location. You must add accurate shipment details and set up a printer to print your shipping labels. Here are the steps to use shipping labels:
- Buy a shipping label from the Shopify app or your Shopify admin via the Fulfillment page
- Download the label and use a supported label printer to print the shipping label
- Attach the shipping label to the outside of the package
How to print shipping labels on Shopify
- From Shopify admin > Settings > Shipping and delivery
- From the Shopping labels section, click Print test label next to the chosen format you want to print
- Find the file on your computer if the label is downloaded to your computer. Otherwise, open the tab if the labels open in a new browser tab.
- Select the print option
- Select the printer you want to use
- Choose the paper size
- Click Print
About the author

Table of Contents
- What to Consider Before Setting Up Shopify Shipping
- How to review Shopify shipping business eligibility
- How to add Shopify shipment details
- What are the default Shopify Shipping rates?
- How to set up shipping profiles on Shopify
- What to consider when setting up Shopify shipping profiles:
- How to set up a general shipping profile on Shopify
- How to set up a custom shipping profile on Shopify
- How to set up shipping on Shopify: 9 different categories
- 1. How to create flat shipping rates
- 2. How to create shipping rates in local currencies
- 3. How to create calculated shipping rates on Shopify
- 4. How to set up mark up or discounted calculated rates
- 5. How to create free shipping rates on Shopify
- 6. How to create free price-based shipping
- 7. How to create free weight-based shipping
- 8. How to create free shipping for specific products
- 9. How to create free shipping for specific customers
- How to edit a rate on Shopify
- How to delete a rate on Shopify
- What are Shopify shipping labels?
- How to use shipping labels for orders:
- How to print shipping labels on Shopify