Customer service has never been more critical than in the age of the information superhighway. A prompt reply, an efficient solution, or a simple acknowledgment can be the difference between a loyal customer and a lost opportunity.
Amidst this backdrop, Zendesk stands out as a top tool for ventures aiming to streamline their customer support operations. Whether you’re an emerging startup or a seasoned business, understanding how to harness the full power of Zendesk can significantly uplift your customer service game.
In this article, we’ll dive deep into the nuances of this platform, offering step-by-step guidance on how to use Zendesk effectively (or quick reference to the definition of terms, jump to the Zendesk glossary section at the bottom of this article).
Please note that this is a Zendesk tutorial for beginners learning the platform’s basic features. You can access the Zendesk tutorial pdf from the platform if you need a more comprehensive guide.
Step 1: Sign Up and Setup
Using Zendesk isn’t so different from learning how to use on-demand services. It all begins with visiting the Zendesk website.
Depending on your company size and needs (like the number of agents, volume of tickets, or advanced features), choose a suitable plan. Then, input basic company details. These include your company’s name, its primary domain, and your desired Zendesk subdomain. This sets the foundation for your Zendesk environment.
You can also opt for a free trial, which will allow you to familiarize yourself with the platform before you commit to a subscription. For this guide, we’ll use the free trial version.
Step 2: Design Your Help Center
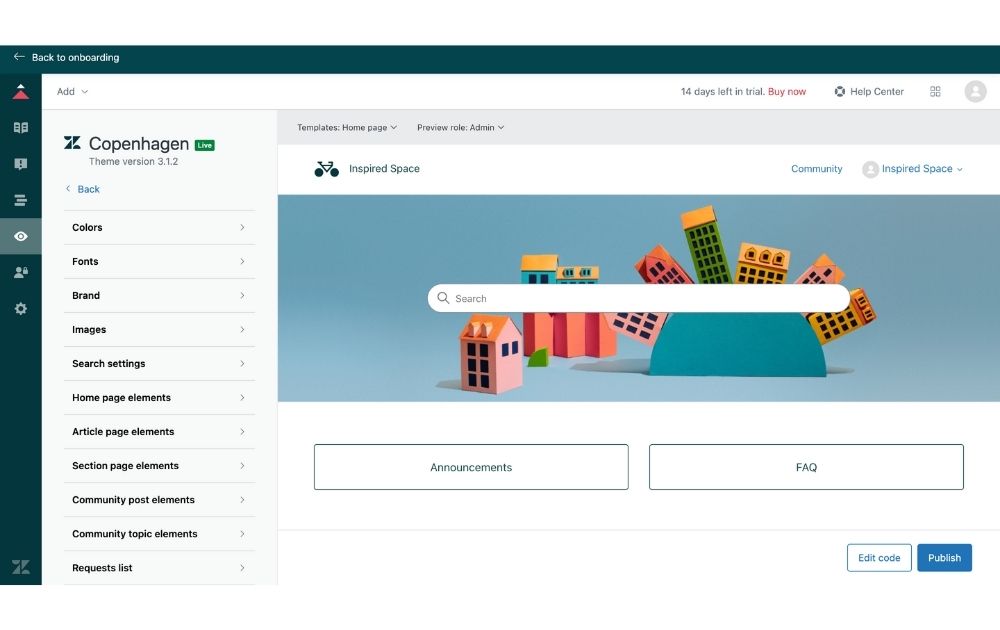
At the Get Started section, scroll down to the Help Center and click Set up your help center.
This will take you to a setup page where you can see Zendesk’s theme templates that you can use as a starting point. Select a theme that closely aligns with your branding, or customize one to fit.
At this stage, you can also add your company logo, adjust color schemes, and select fonts that match your brand guidelines. These elements ensure that your Help Center feels like a natural extension of your other digital platforms.
For more advanced customizations, Zendesk allows you to tweak the CSS and JavaScript, giving you the freedom to fully personalize the design.
Step 3: Create Ticket Views
Creating ticket views in Zendesk is an essential step for managing a support organization that prioritizes efficiency and responsiveness. Views help to segment and organize incoming tickets in a way that makes it easier for agents to provide timely and relevant customer support.
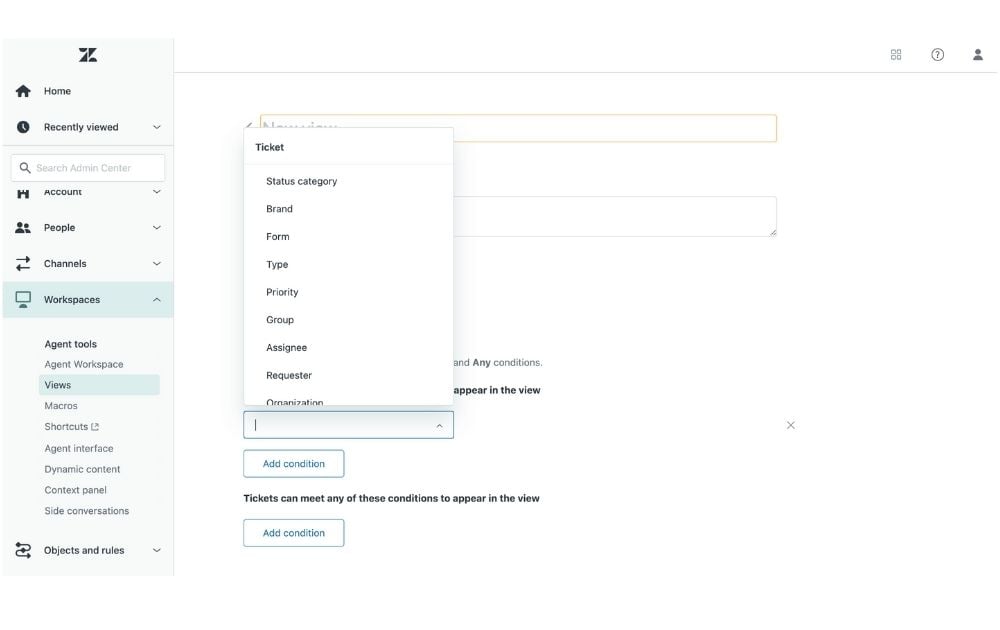
Navigate to the Views section within the Zendesk Support dashboard. Zendesk provides a few default views, like Unassigned Tickets or Recently Updated Tickets, to help you get started. Evaluate these to see if they fit your initial needs.
You can also create custom views based on various ticket attributes like tags, priority levels, assigned agents, or customer type. Custom views can be as simple or as complex as you need them to be. You can set single or multiple conditions to filter tickets. For example, you might have a view that shows all High Priority tickets from VIP Customers that are Unassigned.
Step 4: Set Up Triggers and Automation
Triggers are predefined conditions and subsequent actions in Zendesk. When a ticket meets certain conditions, a corresponding action is instantly taken. For example, when a new ticket is created (condition), an acknowledgment email might be sent to the customer (action).
Automations, on the other hand, operate based on time conditions. For example, if a ticket remains unresolved for 48 hours (time condition), automation can escalate its priority or notify a supervisor.
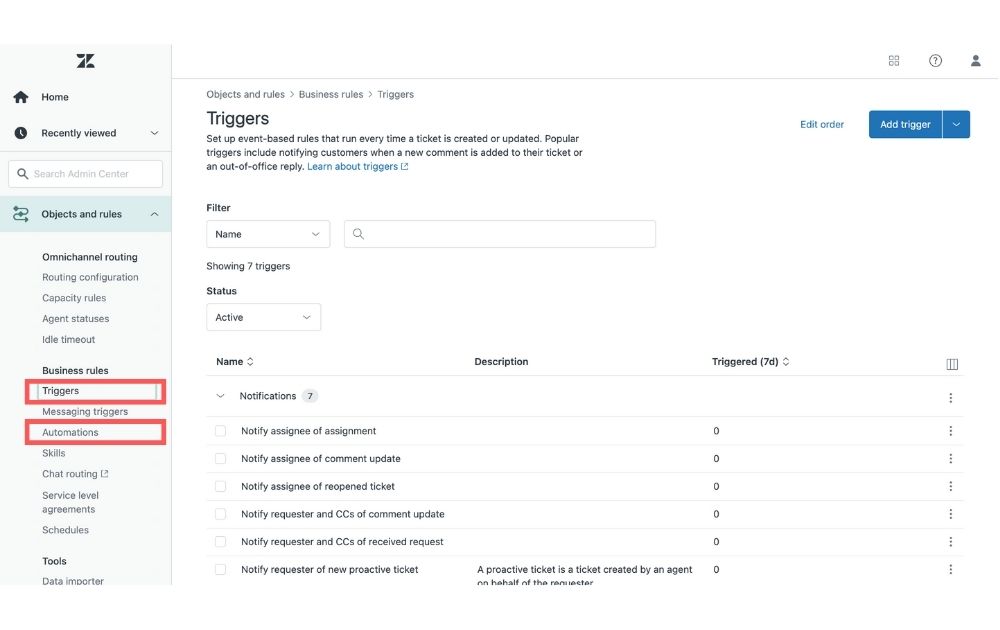
In Zendesk Support, navigate to the Business Rules section, where you’ll find options to manage and create both automation and triggers. Here, you can specify the criteria that must be met for the automation or trigger to activate. This can be based on ticket attributes like priority, status, or tags.
Determine what should happen when the conditions are met. For a trigger, this might be tagging the ticket or sending an email. For automation, actions might be more time-centric, like sending a reminder if a ticket remains unresolved.
Test new automation and triggers in a controlled environment first before rolling them out entirely. This ensures they work as expected and don’t inadvertently affect the customer experience. It’s also best to regularly review their effectiveness. Are they improving efficiency? Are customers receiving timely and accurate communications? Adjust based on these insights.
Step 5: Integrate with Other Tools
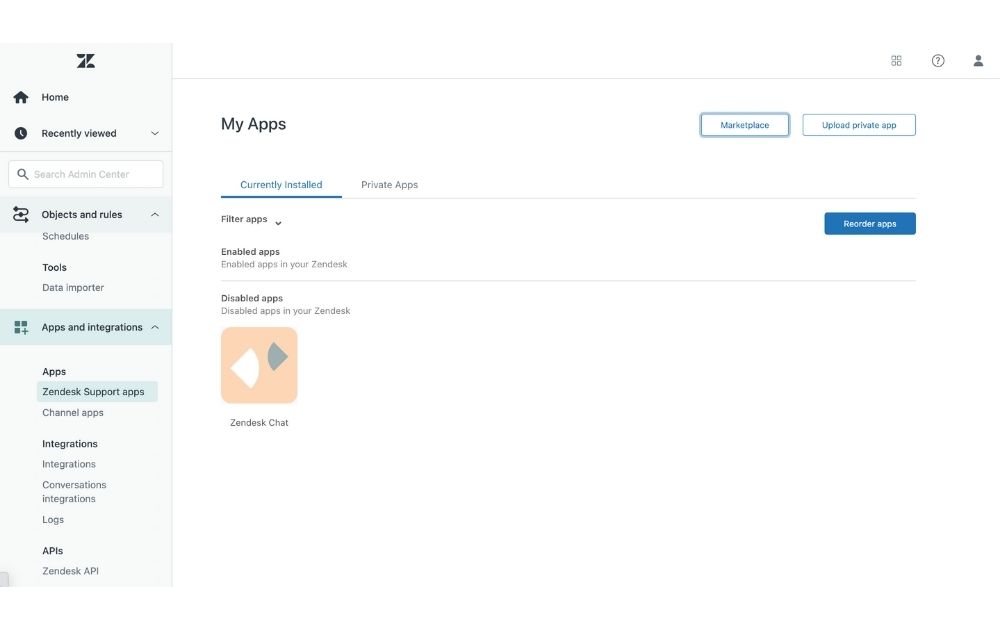
Integrations can pull data from multiple sources, offering a comprehensive view of a customer. This can improve understanding and lead to better, more personalized support.
Go to Zendesk’s Apps and Integrations section. Here, you can upload a private app or go to the marketplace to choose apps to integrate. Clicking the Marketplace button will take you to a page with a list of apps categorized into themes, such as Productivity and Time-tracking, Ecommerce, CRM, Collaboration, and more.
Start with the tools your team uses daily or the ones that house essential customer data. Common integrations include CRM platforms like Salesforce, communication tools like Slack, and marketing automation platforms like HubSpot.
Once integrated, ensure that data flows seamlessly between Zendesk and the third-party tool. Verify that all functionalities work as expected and there are no unexpected disruptions.
Step 6: Monitor Analytics
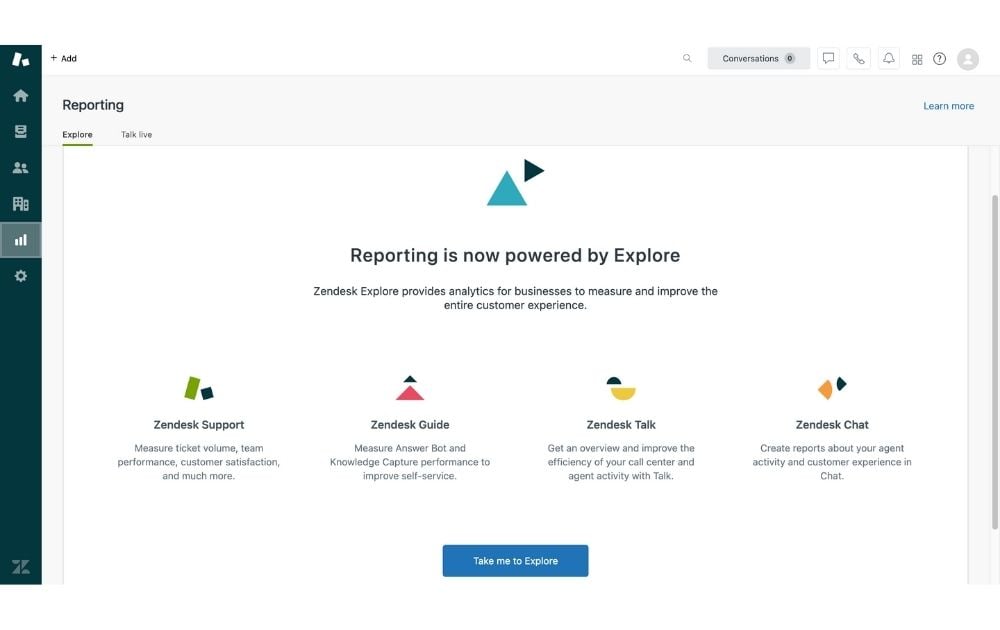
For continuous improvement, head to the Reporting section and click Overview. This dashboard provides critical insights about ticket volume, resolution time, customer satisfaction, and more.
Regularly checking these metrics helps you gauge the efficiency of your support process, identify areas for improvement, and ensure that your team consistently meets or exceeds customer expectations.
For more detailed information about using the platform or if you’re looking for a way to learn Zendesk for free, you can watch this Zendesk tutorial YouTube video.
Frequently Asked Questions (FAQs)
Here are a few frequently asked questions about Zendesk.
What is Zendesk, and how do you use it?
Zendesk is a cloud-supported customer support software that assists companies in handling customer communications across various platforms like phone, chat, email, social networks, and more. With its suite of tools, businesses can streamline their customer support processes, enhance customer satisfaction, and maintain organized, efficient communications. You can use the platform to create a ticketing system that captures and processes customer inquiries and craft a knowledge base where businesses can build FAQs, guides, and articles. You can also use Zendesk’s tool for live chat support, its call center solution, and its analytics and reporting tool to measure and improve customer service performance.
How does the Zendesk work?
Zendesk centralizes customer interactions from multiple channels, including email, chat, phone, and social media, into a unified ticketing system. It automates routine processes, creates a self-service knowledge base, provides detailed analytics on support performance, and integrates seamlessly with various third-party tools and systems. Through these features, Zendesk enables businesses to efficiently manage, streamline, and enhance their customer support operations.
What is Zendesk used For?
Beyond ticketing, Zendesk offers tools to create self-service knowledge bases, live chat interfaces, phone support, and analytics to monitor performance. Additionally, it integrates with many third-party applications, enabling businesses to customize and enhance their customer service workflow. Overall, Zendesk aims to strengthen business and customer relationships by providing efficient and effective support tools.
Is Zendesk easy to use?
Yes, Zendesk is designed with user-friendliness in mind, making it accessible for both businesses and their customers. Its intuitive interface, comprehensive onboarding tutorials, and a vast array of support resources ensure that teams, regardless of their technical expertise, can quickly adapt to and efficiently use the platform. Furthermore, Zendesk’s ability to centralize and automate many customer service tasks simplifies the overall support process for agents.
How do I use Zendesk customer service?
To use Zendesk for customer service, start by signing up on their website and configuring your company profile. Integrate your desired support channels, such as email, chat, and phone. With Zendesk Guide, you can set up a self-service portal filled with FAQs and articles. All incoming customer interactions become tickets, which can be managed, categorized, and addressed efficiently. You can also set automatic triggers for common scenarios and, to continuously improve, leverage Zendesk Explore for performance analytics. For any challenges, Zendesk provides ample support resources.
How do I download a Zendesk ticket as a PDF?
To download a Zendesk ticket as a PDF, first open the desired ticket in your browser. Use the browser’s ‘Print’ function. In the print dialog, choose Save as PDF or a similar option as the printer destination. Confirm, and the ticket will be saved as a PDF file on your computer. Note that the exact appearance may differ slightly from the online view due to browser printing formats.
How do you track tickets in Zendesk?
In Zendesk, tickets can be tracked using the built-in views feature, which categorizes and lists tickets based on predefined criteria. Users can access specific views to see tickets in various stages, such as Open or Pending. Additionally, Zendesk offers reporting tools in its ‘Explore’ module, where detailed analytics on ticket volumes, response times, and agent performance can be monitored. This combined approach ensures timely responses and efficient ticket management, facilitating improved customer service.
Benefits of Using Zendesk for Customer Support
Here are some of the key advantages of Zendesk and why it has emerged as a popular tool in the realm of customer support software:
- Centralized Customer Interactions. Since the platform consolidates communications from email, chat, phone, and social media into a single platform, it ensures that no customer query is missed.
- Enhanced Customer Satisfaction. Features like automated ticket routing and AI-powered response suggestions enable timely and personalized customer support.
- Operational Efficiency. Zendesk streamlines support operations with robust analytics, reporting tools, and an intuitive interface, reducing the learning curve for new users.
- Scalability. The platform easily adapts to the growing needs of businesses of all sizes without compromising performance. That said, it’s a good option for ambitious ventures looking for tools they can continue to use as they expand.
- Improved Agent Productivity. Automated workflows and customizable dashboards allow agents to focus on priority tasks and manage workloads more efficiently.
- Informed Decision-Making. Offers detailed insights into customer behavior and support team performance, enabling data-driven improvements.
- Consistency in Communication. Macros for frequent responses ensure consistent and efficient communication across all customer interactions.
Customizing Your Zendesk Dashboard for Maximum Productivity
Personalizing your Zendesk dashboard can significantly boost productivity by ensuring that the most relevant information and tools are readily accessible. Here are a few tips to do this:
You can customize your dashboard to display key metrics such as:
- Ticket Volume
- Ticket Status
- First Response Time
- Average Resolution Time
- Customer Satisfaction Score (CSAT)
- Service Level Agreement (SLA) Compliance
- Net Promoter Score (NPS)
- Top Tags/Keywords
This immediate access to critical data enables users to prioritize their tasks effectively and manage their workload more efficiently.
Additionally, the ability to create and modify ticket views based on specific criteria (such as urgency, customer type, or issue category) helps in organizing the support queue and ensures that agents can quickly identify and respond to the most pressing issues.
Zendesk Glossary of Terms
Here’s a glossary of a few terms you might come across when learning how to use Zendesk:
- Agent. An individual authorized to handle tickets in Zendesk. Agents interact with customers to address their concerns or issues.
- Automation. Similar to triggers, they run at set intervals, typically for time-based actions. For instance, sending a reminder email if a ticket remains unresolved after a certain period.
- Channel. The medium through which a customer contacts support, such as email, chat, phone, or social media. Zendesk centralizes these different channels into its platform.
- Macro. A predefined action or set of actions in Zendesk that agents can use to update tickets with repetitive responses or actions.
- Tag. A keyword or label that can be added to a ticket, allowing for more detailed categorization and easier searching/filtering of tickets.
- Ticket. A record of a specific customer interaction or support request. It captures the customer’s initial inquiry and all subsequent conversations related to it until resolution.
- Trigger. An automated action in Zendesk that is executed when specific conditions are met. For example, sending an acknowledgment email to a customer when a new ticket is created.
- View. A predefined set of ticket conditions that allow agents to organize and prioritize their workflow. Views can help agents easily see tickets based on different criteria, such as status, priority, or tags.
Zendesk Success Tips
Here are a few tips for beginners looking how to use Zendesk and make the most out of their subscription:
- Centralize Your Support Channels. Zendesk brings multiple customer support channels (email, chat, phone, social media) under one roof. Ensure you integrate all your customer touchpoints with Zendesk to benefit from a centralized view of customer interactions and provide consistent support across all channels.
- Utilize the Knowledge Base. Before diving deep into ticket management, invest time in setting up a robust Knowledge Base using Zendesk Guide. Populate it with frequently asked questions, tutorials, and relevant documentation. A well-organized self-service portal can significantly reduce ticket volume and empower customers to find answers independently.
- Leverage Automation and Macros. For repetitive tasks or commonly used responses, set up automation and macros. This saves the agents time and ensures that standard procedures and responses are followed, enhancing the consistency and quality of support.
- Regularly Review Analytics. Zendesk Explore provides valuable insights into your support operations. Regularly check metrics like ticket resolution time, customer satisfaction scores, and agent performance. Use these analytics to identify areas of improvement and to tailor your support strategy accordingly.
- Engage with the Zendesk Community. As a beginner, you’re not alone in your journey to master Zendesk. Join Zendesk’s user community, participate in forums, and attend webinars. Engaging with other users can provide valuable tips, best practices, and solutions to common challenges.
Mastering Zendesk can significantly streamline your customer service operations, ensuring that every interaction is handled efficiently and professionally.
As you continue to enhance your customer support tools, consider exploring other platforms that can complement your efforts. One such tool is Penji, a versatile solution for all your design needs. Sign up today and witness how it can transform your business.
About the author

Carla Deña
Carla is a journalist and content writer who produces stories for both digital and legacy media. She is passionate about creativity, innovation, and helping small businesses explore solutions that drive growth and social impact.
Table of Contents
- Step 1: Sign Up and Setup
- Step 2: Design Your Help Center
- Step 3: Create Ticket Views
- Step 4: Set Up Triggers and Automation
- Step 5: Integrate with Other Tools
- Step 6: Monitor Analytics
- Frequently Asked Questions (FAQs)
- What is Zendesk, and how do you use it?
- How does the Zendesk work?
- What is Zendesk used For?
- Is Zendesk easy to use?
- How do I use Zendesk customer service?
- How do I download a Zendesk ticket as a PDF?
- How do you track tickets in Zendesk?
- Benefits of Using Zendesk for Customer Support
- Customizing Your Zendesk Dashboard for Maximum Productivity
- Zendesk Glossary of Terms
- Zendesk Success Tips